
Get started with Veeam Backup And Replication: if you finding how to start with veeam backup then here you can find how to get started with veeam backup and replication step by step check it and get started.


While those features are a good quick list of what Veeam Free Edition can do, let’s dive into some of the most popular features. Veeam Backup Free Edition can be summarized in these three powerful categories:
- VeeamZIP – Creates an ad-hoc backup of a running VM, which gives you many benefits such as being able to easily copy a backup to another host without having to power off the original VM
- Powerful and flexible restores – Supports a number of recovery scenarios, including recovery of an entire VM, guest OS files, and individual application items
- Quick Migration (VMware) – Migrates a live VM between hosts or datastores with minimal downtime and without requiring clusters, shared storage, or even VMware vMotion or Storage vMotion
When I wrote the Infographic, Veeam Backup & Replication v7: By the Numbers; I made a distinct effort to ensure that Backup Free Edition was well represented. In fact, I counted 12 powerful features by Backup Free Edition:
- VeeamZIP Backup
- Veeam Explorer for Exchange
- Veeam Explorer for Storage Snapshots
- Veeam Explorer for SharePoint
- Quick Migration for VMware
- File Copy Job
- VM Copy Job
- FastSCP Editor
- Native tape support
- File level recovery from backup
- Whole VM recovery from backup
- VM file recovery from backup (VMX, VHD, VMDK, etc.)
Quick Migration (VMware)
Quick Migration lets you migrate live VMs between hosts or datastores without requiring clusters, shared storage or advanced functionality that is not available in lower-level hypervisor editions. Quick Migration works well even in environments with slow or high latency connections that prevent VMware vMotion and Hyper-V Live Migration from working!
VeeamZIP
VeeamZIP delivers technology that lets you create backups of running VMs. With VeeamZIP, you have to specify only two things – the VM you want to backup and where your resulting backup file will go. It’s that easy! The backup will be deduplicated (within the single VM being backed up) and compressed, resulting in significantly lower backup storage requirements. Many people ask what benefit this will provide in terms of disk space when only a single VM is involved when I use VeeamZIP on a single VM; the disk savings are usually about half that of the VM’s actual usage on disk. The figure below shows a VeeamZIP ad-hoc backup being started:
VeeamZIP is helpful when:
- You need to update a VM. Users frequently take a VeeamZIP backup before making any changes to a VM, such as before applying updates or patches.
- You need to archive a VM. It’s simple to create a deduplicated and compressed copy of a VM before removing it from your virtual infrastructure.
- You need to copy a VM to a remote host or test lab. VeeamZIP encapsulates VM configuration settings so you can easily transfer and run a VM in a different location.
VeeamZIP is also very efficient. The processing engine is fast, and optimizations include parallel processing of virtual disks, filtering out empty blocks, and more.
Powerful and flexible restores
Veeam Backup Free Edition supports several data recovery scenarios, beginning with the recovery of a VM file and going all the way to restoring an entire VM. The list includes:
- Restoring VM files (.vmdk, .vmx and others for VMware; .vhd, .vhdx, .xml and others for Hyper-V). Veeam Backup Free restores VM files directly from deduplicated, compressed backups without having to extract the VM from the backup.
- Restoring an entire VM. You can restore an entire VM to the same location or to a new location.
- Restoring VM disks (VMware). If a VM disk becomes corrupted by an OS failure or some other cause, you can simply restore the affected VM disk and connect it to the original or recovered VM.
- Restoring guest OS files. You can restore guest OS files for Windows FAT and NTFS file systems, and also ReFS with OS-level deduplication when running Windows Server 2012. Moreover, a special wizard and a virtual helper appliance provide support for 17 additional file systems. In all cases, Veeam Backup Free Edition is able to restore the guest files without having to extract the entire virtual disk image from the backup.
Setting Up A Veeam Replication
To start we need to select the backup and replication tab. Do so.

veeam backup and replication
Then under Backup and Replication and expand jobs and right click replication and select replication job.

Setup a replication job in veeam
Enter a valid name for your replication job and then select next.

Setup DR replication in Veeam
Then, on the right-hand side of the next screen select Add. You can then expand to your virtual center and select to servers you would like to replicate. You can see I have added my servers here.
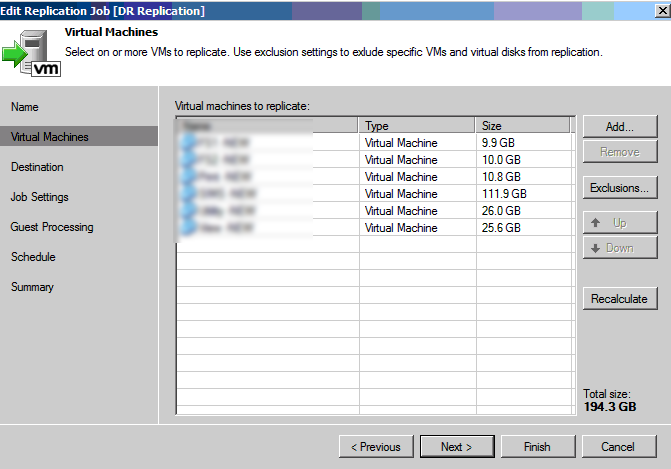
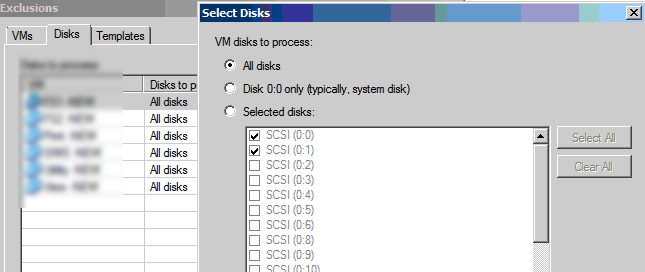
If on some of your servers you do not wish to replicate all of the drives on that server to save space. simply select a server then select exclusions. You can then exclude your drives. If you are unsure what the drives are. In virtual center right-click the server, select hard drives and you will be able to see the SCSI ID to tally up what drive is what.
The next section is quite important. You get the option to choose your DR host if you have one a resource pool and the datastore on the DR host.

selecting DR host in veeam
Under host and cluster, click Choose and browse to the DR host you added to the managed servers section earlier. Then select ok.

Veeam choosing a DR host
If you have a resource pool on your DR host then again select it, I’m just using the default pool here. Again the same for folders if you have them defined, I do not. Then finally select the datastore you would like to replicate to. If you have multiple datastores then it may be an idea to have multiple replication jobs the replicate to multiple stores. Once you have chosen your options click next.
On the Job settings screen that follows leave the settings of automatic proxy enabled unless you have a specific backup proxy server setup. You get the option to select a repository for the backups metadata, I have a NAS box so I'm using it, you can just use the default setting that is the clusters datastore. The replica name suffix is what the replicated servers have as a suffix on the DR host. For example, ALLENSERVER on the cluster would become ALLENSERVER_replica.
Restore points is as it says, how many replications would you like to be able to go back to.
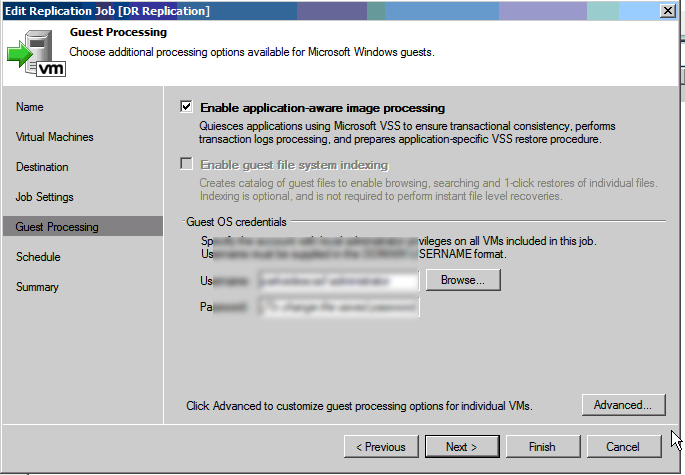
The next screen is for VSS, pop in your domains admin credentials, this allows veeam to lo-gin to VSS aware applications such as SQL and Exchange. If you are using any of these applications then enter the information here. Then select next.
Then next screen is fairly self-explanatory. Set your schedule of when you would like the veeam replication to take place. If you have the network bandwidth there is no reason to not run it continuously, that means in the event of a failure you will have lost the least amount of data. Click next.

setup veeam schedule
You will see the summary screen. Pop a stick in replication to start now and the job will run. If not wait until your schedule begins. Once it has completed it will look like this.

As you can see the servers have replicated and the suffix has been added.
In this article, I have told you that "How to Get started with Veeam Backup And Replication Step by Step"


0 Comments